🧪 Welcome to My Resin 3D Printing Studio: A Peek Behind the Scenes
(This website contains affiliate links that might generate an income from the products)
Ever wondered what it takes to set up a functional and inspiring resin 3D printing space? Whether you’re new to the world of resin printing or you’re just curious how others organize their setup, I’m excited to give you a guided tour of my studio.
🏠 Space and Layout
The first challenge was finding the right spot—resin printing is a bit messy and needs to be out of the way. Unfortunately, I have very limited space (only because I have too much stuff, lol). Currently, things are not very efficient, but it gets the job done.
- Ventilation: Resin fumes require airflow, so I use an air purifier with a carbon filter. I also run the exhaust fan in the nearby bathroom from time to time.
- Surfaces: All work surfaces are non-porous and easy to clean. I use silicone mats and trays to catch spills.
- Lighting: I have an overhead light that I use only when the printer isn’t running. UV Printers do NOT like light. My printer is in a room with no windows – it is actually a walk-in attic space that is temperature controlled.
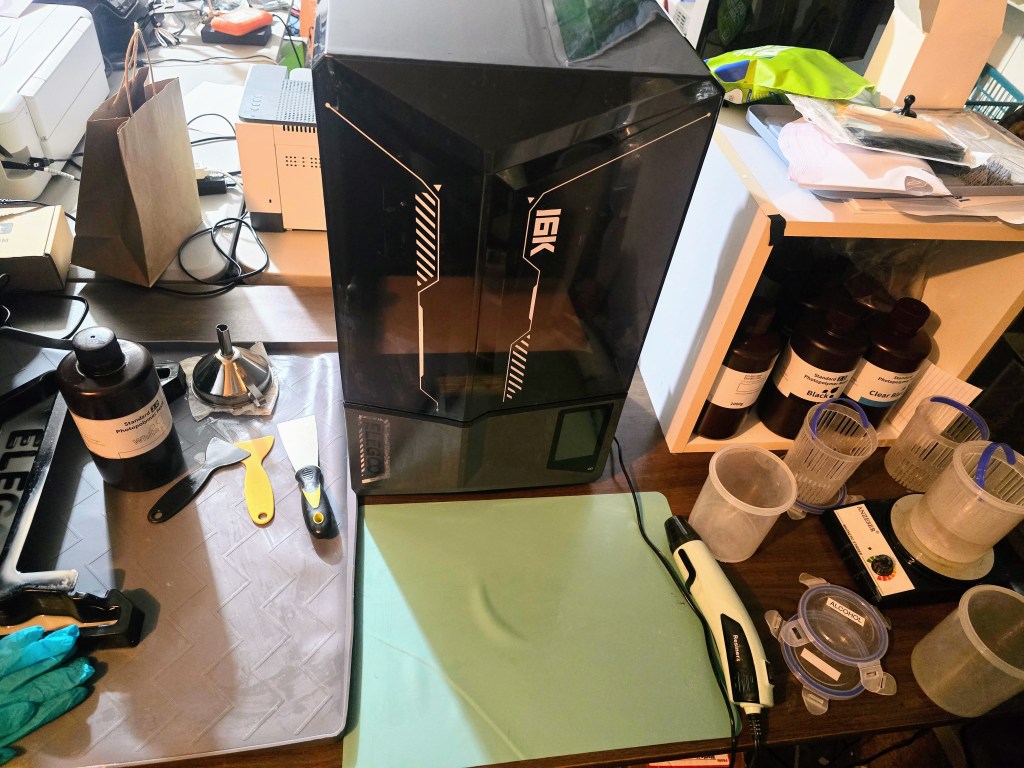
🖨️ My Printing Station
Here’s the beating heart of the studio:
- Printer: I run an Elegoo – Saturn 4 16K resin printer, known for its high-resolution prints and reliability.
- Leveling: This printer is self-leveling, so I really don’t need to worry. But, I did make sure the table that it is sitting on is very sturdy and doesn’t bounce around during the printing. The table is actually one of the first mdf heavy duty folding tables from the 70’s. It weights a feakin’ ton.
- Prep: My prep space is very small, just a couple of square feet. I do use the silicone mats as mentioned above. Trust me resin can get everywhere!
- Safety First: Nitrile Gloves, eye protection (I wear eyeglasses), and a face mask with a carbon filer are always within reach. I also keep my hair tied back because it will get into the resin.
💦 Washing & Curing Setup
Once the print is done, the messy magic begins.
- Washing (alcohol): I use a plastic pickle jar filled with isopropyl alcohol for precision cleaning. Instead of hand shaking or using an expensive ultrasonic machine, I put the jar with alcohol on a magnetic stirrer. I repeat this a second time to make sure the pieces are clean. After I dump alcohol into a plastic bottle.
- Washing (water): I then take pieces in the bathroom and rinse then with water. (*I do NOT let that water go down the drain! Many people say it is okay, because it has been cleaned with alcohol, but don’t do it!) I pour off the water into a plastic container. I leave the containers open so that the water can evaporate off and leave the resin residue in the bottle.
- Curing: I put the prints on a tray. The tray sits on a solar powered rotating display stand. This all sits under a UV light. By having the pieces rotate, it insures better exposure and thorough curing.
🗃️ Organization & Resin Management
I am not the neatest of people, but resin can be sticky business if you’re not a little bit organized
- Resin Storage: Opaque containers labeled by type and color; extras stored in a box
- Tools & Parts: I really don’t have too many tools – the funnel with filters for putting resin back into a bottle, and two plastic scrapers: one for scrapping the pieces off the plate and a second to scraping the resin out of the tank.
- Waste Management: Resin waste is stored and hardened before proper disposal—no shortcuts here!


Leave a comment